


After last nights pastry themed Great British Bake Off, I decided to share my pastry making tips with you all. I often like to bake at home and one of the great benefits of having granite worktops is that they are perfect for pastry. A pastry board is not necessary as a flat granite surface is all you need to roll it out.
Cool surface
An old cooks saying is that pastry should be prepared with cool hands to get the best out of your bake. Both short crust and puff pastry need to be kept cool for the best results which means that a cool floured granite surface is ideal.
Easy to clean
The naturally cool temperature of granite is not the only reason why it is perfect for preparing pastry. When rolling out pastry you tend to use a lot of flour; a smooth granite surface makes it quick and easy to wipe the excess flour away.
Hard to scratch
Granite is a very durable surface and will last a lifetime and more. This means you are able to cut on the surface without worrying about scratches. Therefore you don’t need to worry about cutting into your pastry without a chopping board or even using a metal cooling rack.
Bacteria Resistant
Granite is a sanitary countertop material and, therefore does not harbour bacteria. This makes it more hygienic for preparing pastry on rather than other countertops such as wood.
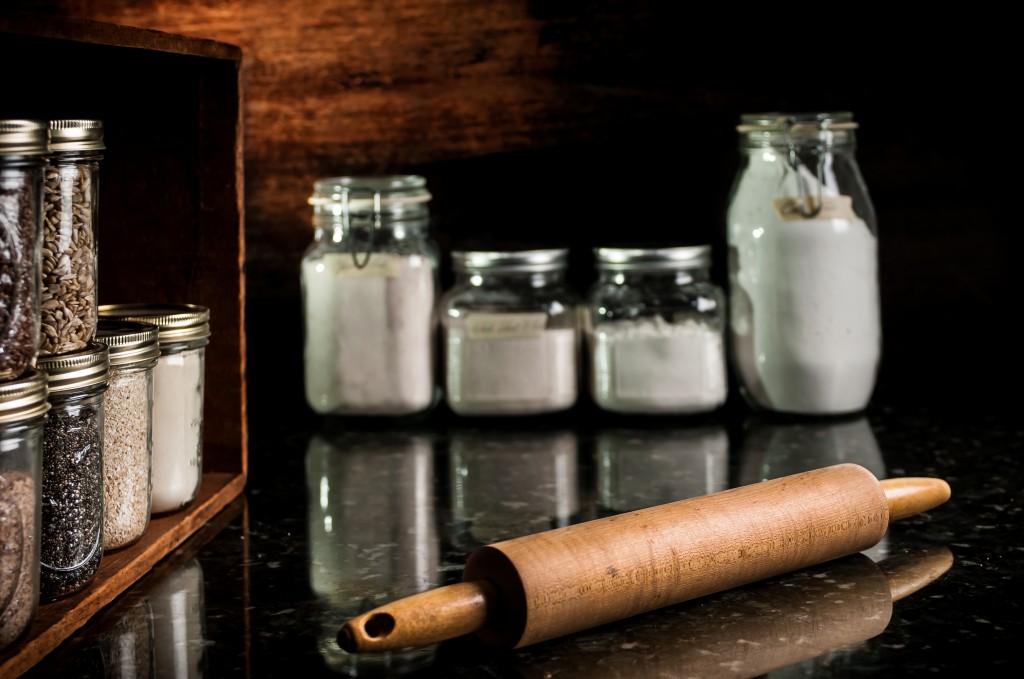
Essential Pastry making equipment

Before you start making your pastry you need to ensure you have all the necessary equipment. I’ve made a list of the equipment I use when preparing my pastry below:
-
Cooling Rack
Cooling racks are important when baking; leaving your bake on a flat surface can result in a soggy bottom due to steam getting trapped underneath.
-
Brushes
Use a pastry brush to spread a glaze or egg wash on the crust. Flatter brushes are best for larger surfaces whereas rounder brushes are great for brushing the rims of pastry.
Make sure you don’t put your brushes in the dishwasher as they can collect nasty bits of dirt and grit; wash them in warm water and washing up liquid.
-
Flour Dredgers
Sprinkling flour with your warm hands can cause pastry issues. Want an even surface? A dredger is an easy way to do the job without even having to think about it.
-
Rolling Pin
A rolling pin needs to be wooden, plain and straight without handles, this is to ensure nothing gets in the way when rolling out large sheets of pastry.
My Favourite Puff Pastry Recipe

One of my favourite pastries is puff pastry, It has a higher fat content compared to short crust and uses special rolling and folding techniques. To ensure puff pastry success you need to make sure that the dough and butter are cold before you mix them together. It is worth chilling the flour before and having a Silestone worktop will help to keep the ingredients cool when rolling the pastry out.
Below is my favourite puff pastry recipe for you to follow:
Puff Pastry Ingredients:
150g strong white flour, 150g chilled plain flour, a pinch of salt, 2 large eggs, 100ml cold water & 250g of unsalted butter.
Step 1: Combine flour, salt, eggs and water then transfer the dough to a lightly floured surface and knead for 5-10 minutes until smooth. Shape the dough into a ball and place in the fridge to chill for at least 7 hours.
Step 2: Flatten butter into a rectangle by battering it down with your rolling pin, by placing the butter between 2 sheets of cling film. Then return the butter to the fridge to harden.
Step 3: Roll out the dough to a rectangle (approx 60 x 20 cm). Then put the butter on the dough so that it covers the bottom two-thirds. Make sure you have done this neatly and cover the two edges.
Step 4: Lift the exposed dough at the top and then fold it down over half of the butter. Then fold the butter covered bottom half of the dough over the top. This will achieve a sandwich of 2 layers of butter and 3 of dough. Pinch the edges to seal and then put back in a plastic bag and chill for an hour.
Step 5 : Place the dough on a lightly floured surface with the short ends facing towards you. Roll the dough out to a rectangle whilst keeping the edges as even as possible. Fold the top quarter down and bottom quarter up for them to meet in the centre. Next fold the dough in half and cool down for a further hour.
Step 6: Place the dough onto a floured surface with the short ends towards you. Roll into a rectangle and fold down one-third and fold up the bottom third of the dough achieving a perfect square. Chill for another hour.
Step 7: Bring the dough out of the fridge and do a single turn as before. Once you have chilled overnight your dough will be ready to use.
Hi, I'm Karen and I work with my husband Steve at Planet Granite U.K. Limited. We produce and install granite and quartz worktops, and we love what we do! My passion lies specifically in Kitchen Design, so in my blog you'll be able to view some tips, guides and examples of wonderful kitchen designs, hope you enjoy them.